Repotting Aloe Vera Step by Step: A Complete Beginner-Friendly Guide
Learn how to repot Aloe vera step by step with a clear, practical and beginner-friendly guide. Covers signs your Aloe needs repotting, best soil mix, pot selection, exact steps, aftercare, mistakes to avoid, and FAQs for Indian home gardeners.
Repotting Aloe Vera Step by Step: A Complete Beginner-Friendly Guide
Aloe vera is one of the most loved indoor plants in India – it’s low-maintenance, grows steadily, and has well-known medicinal benefits. But even a hardy plant like Aloe needs repotting every few years to stay healthy. Many people avoid repotting because they think it is complicated, but the truth is: repotting Aloe vera is simple when you follow the right method.
This guide explains how to repot Aloe vera step by step in a natural, easy-to-understand way. It covers when to repot, what soil mix to use, how to handle the roots safely, and how to care for the plant after transferring it to a new pot. Everything here is written for modern Indian plant parents who want a clear, practical and stress-free method.
Why Repotting Aloe Vera Is Important
Aloe vera grows slowly but steadily. Over time, the roots fill up the pot and the soil becomes compacted. This leads to poor drainage, slower growth, and sometimes root rot. Repotting gives the plant:
- Fresh, breathable soil
- More space for root growth
- Better drainage
- Room for offsets (baby plants or pups)
- A cleaner, healthier environment
If you notice stunted growth, yellowing leaves, roots coming out of the bottom holes, or a top-heavy plant that keeps falling, it is probably time to repot your Aloe vera.
When to Repot Aloe Vera
The best time to repot Aloe vera in India is during spring or early summer, when the plant is actively growing. Avoid repotting in winter because Aloe slows down in cold weather and takes longer to recover. Ideally, repot Aloe vera every 2–3 years, or sooner if the pot becomes overcrowded with pups.
What You Need Before Repotting
Gathering all materials beforehand makes the repotting process smooth and clean. Here is a simple list:
- New pot 1–2 inches larger than the current one (with drainage hole)
- Well-draining soil mix (cactus mix or homemade mix)
- Gloves and a clean tray/newspaper
- Sterilized scissors or pruning shears
- Trowel or spoon
- Watering can
Avoid choosing a pot that is too big. Aloe does not like sitting in large amounts of wet soil. A slightly bigger pot is enough.
The Best Soil Mix for Aloe Vera
Aloe vera needs a soil mix that drains quickly. Normal garden soil or heavy compost can hold too much moisture, which increases the risk of rot. The ideal Aloe vera potting mix is:
40% regular potting soil + 40% coarse sand/perlite + 20% cocopeat or compost
This mix provides the right balance of drainage, airflow and nutrients. If using cocopeat, ensure it is not overly water-retentive.
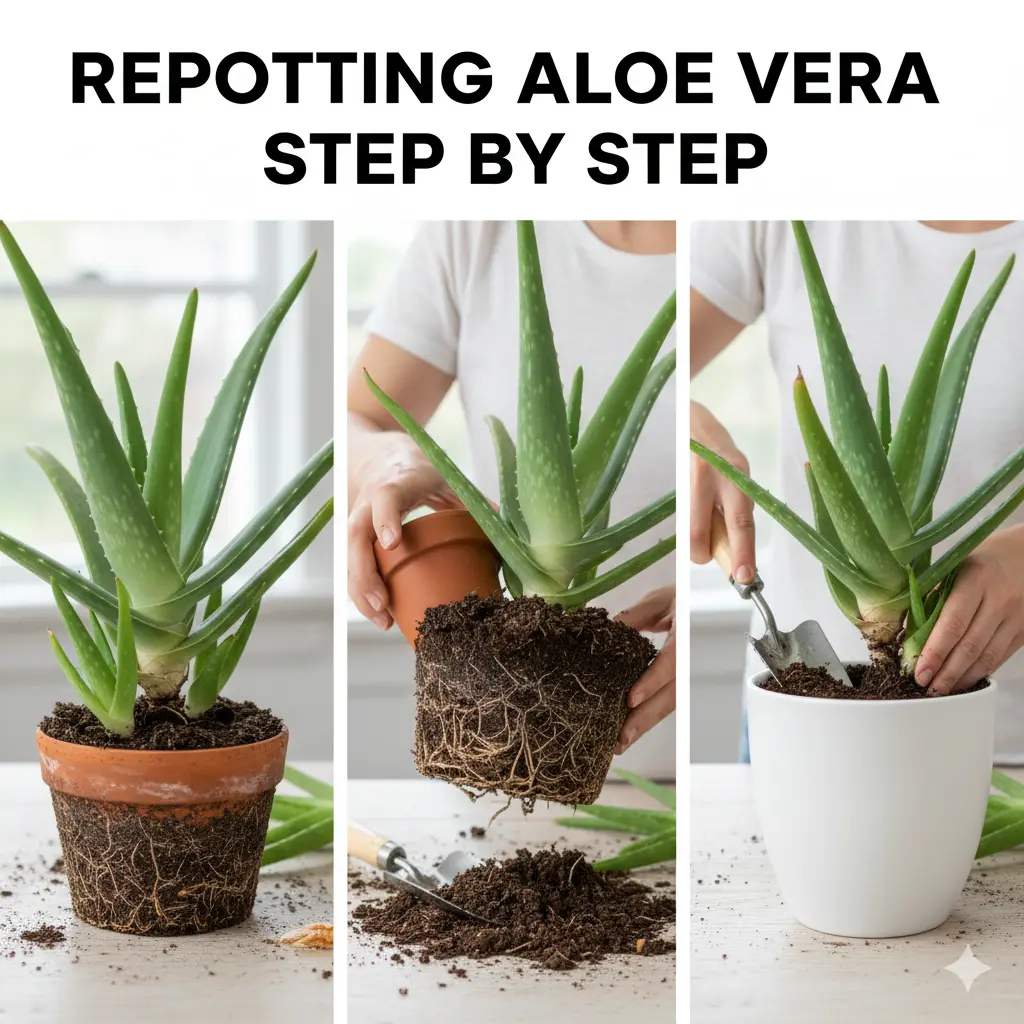
Step-by-Step: How to Repot Aloe Vera
Step 1: Prepare the New Pot
Fill the bottom of the new pot with a thin layer of gravel or stones (optional) for better drainage. Add a layer of fresh potting mix on top. The goal is to position Aloe so that the base of the plant sits just above the final soil level.
Step 2: Stop Watering Before Repotting
Avoid watering the Aloe for 2–3 days before repotting. Slightly dry soil is easier to handle and reduces the risk of accidental root damage.
Step 3: Remove the Plant Carefully
Hold the plant near the base and gently slide it out. If it is stuck, tap the pot lightly on the sides. Do not pull by the leaves—Aloe leaves are fleshy and can snap easily.
Step 4: Clean the Root Ball
Shake off excess old soil. Check if the roots look healthy—white and firm. If there are dark, mushy or smelly roots, trim them with sterilized shears. Remove any dead or dried leaves at the base.
Step 5: Separate the Pups (Optional)
If your Aloe has produced small baby plants around it, you can separate them and grow them individually. Make sure each pup has some roots attached. Let the cut areas dry and callous for 1–2 days before planting.
Step 6: Place Aloe in the New Pot
Position the plant in the center and gently fill soil around the root ball. Do not bury the lower leaves—keep them above the soil surface. Lightly press the soil to remove air pockets but do not pack it too tightly.
Step 7: Do Not Water Immediately
This is one of the most important steps. After repotting, Aloe roots need time to heal. Wait 3–7 days before watering. This prevents root rot and allows the plant to settle in its new pot.
Step 8: First Watering
After the waiting period, water deeply until water drains out of the bottom. Then let the soil dry completely before the next watering. Overwatering is the main reason Aloe struggles after repotting.
Aftercare: The First Few Weeks
Once repotted, Aloe vera needs gentle care for about 2–4 weeks.
- Keep it in bright, indirect light for the first week.
- Gradually introduce direct sunlight after 7–10 days.
- Water sparingly—every 2–4 weeks depending on season.
- Avoid fertilizer for at least 1 month.
- Keep the pot in a well-ventilated place.
The plant may look a little tired in the first week, which is normal. It will perk up as soon as the roots settle.
Common Mistakes to Avoid
Here are mistakes that often harm Aloe vera during or after repotting:
- Using a pot that is too large
- Watering immediately after repotting
- Using heavy soil with poor drainage
- Burying the base of the plant too deep
- Keeping the plant in low light after repotting
Aloe vera is naturally adapted to dry, sunny environments. Repotting should feel similar to how it grows in nature—dry roots, airy soil, and bright light.
FAQs About Repotting Aloe Vera
How often should I repot Aloe vera?
Every 2–3 years or when the plant becomes root-bound.
Can I repot Aloe in monsoon?
It is not recommended. Soil stays wet longer in monsoon, increasing rot risk.
Why are Aloe leaves bending after repotting?
Usually due to overwatering or weak root support. Let the soil dry and give the plant time to stabilize.
Can Aloe vera grow in plastic pots?
Yes. Plastic pots are lightweight and retain moisture, but ensure proper drainage and avoid overwatering.
Final Thoughts
Repotting Aloe vera is a simple but essential part of keeping the plant healthy. With the right pot, well-draining soil, gentle handling, and proper aftercare, Aloe recovers quickly and grows even better than before. Just follow these step-by-step instructions, avoid overwatering, and give your plant bright light. In a few weeks, you’ll see fresh new growth and stronger, healthier leaves.